This blog covers the day to day progress of water rocket development by the Air Command Water Rockets team. It is also a facility for people to provide feedback and ask questions.

Wednesday, August 27, 2008

Improved Sensitivity and New Rocket

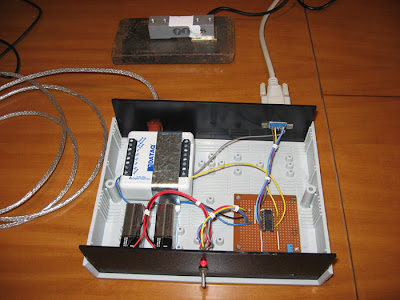
This week I spent a day rewiring the load cell and amplifier after one of the guys (PK) on the Australian Rocketry forum made some good suggestions about how to reduce the signal noise. I placed the load cell amp close to the load cell and enclosed the whole thing in a metal box. I also used coax cable to run the long lead to the DataQ logger. The noise level dropped off dramatically. It is now down to around 0.02V over the -9V to 9V range.


On the 70Kg load cell that allowed me to resolve down to ~5 grams = a sheet of A4 paper. (Yes I actually put a folded sheet of paper on it). This means we can get thrust measurement accuracy down to about 0.05 Newtons. This hopefully should be good enough to observe the subtle changes to components under test.

I'm very happy with the setup now. All we have to do is build the stand. The stand is a little more complex because it is going to be put on a pivot to allow us to flip it upside down and fill the rocket with water. I'll have to wait with this until next week as we have to get our rockets ready for the August 30th launch day.

Big thanks also goes to Tarp, astro and patch and others who helped me get the right parts and steer me in the right direction.

New Rocket - 2 Stage with drop away boosters

We have decided to combine a couple of our existing rockets to make up a bigger rocket to launch on Saturday. We are taking the two stage rocket launched last time and adding another 2L bottle to the bottom of it. This actually came from Polaron VI launched a couple of months ago and includes the booster retention tubes. We will attempt to launch the rocket using the Gluon II boosters.

This will be our most complex rocket to date, and because of that I am not sure how successful we'll be in getting it off the ground. But it will sure be fun to try. A brief outline of the rocket configuration:

Sustainer: (Tachyon V) 3.35L capacity using 1300mL of water + foam, 9mm nozzle. It is fitted with our V1.5 flight computer for deployment, has a FlycamOne2, a z-Log altimeter and a single parachute.

Main Stage: (Baryon III) 9.2L capacity using about 3 L of water + foam, with a 9mm nozzle. The sustainer is released by the Mk2 stager, and the single parachute is deployed upon release of the second stage using the piano hinge principle.

Boosters: (Gluon II) Attached to the mains stage are three boosters, each with a 3.35L capacity using about 1.25L of water each. Each has a 13mm nozzle and is equipped with a piano hinge parachute deploy mechanism that releases the parachute as soon as the booster separates from the main stage.

I haven't measured it but it stands about 2.5m tall. Will post details of rocket and if a flight is successful with the next update.

_____________________________________________________

Sunday, August 24, 2008

Test stand update

On Friday I received the the load-cell so I was keen to get it hooked up since now I had all the components. It took most of Saturday to get everything designed and soldered up, and today I powered it up and ran some tests.

The current setup with the load cell amplifier, batteries and data logger housed in the box.

I was able to easily measure loads as low as 20 grams on the 70Kg load-cell. Initially I had some issues with noise being picked up by the wiring, and was able to reduce that about 10 fold with appropriate shielding and grounding things. Later, on the Australian rocketry forum one of the guys suggested how to even further improve the noise margin with cabling and locating the amplifier close to the load cell in a metal box. So the next step is to try that. Luckily I have all the necessary components, but will buy a new diecast aluminium box tomorrow and fit the amplifier in that.

The more accurate the setup is, the more accurately we can determine what effects design changes have on the rocket. With the above setup we can resolve ~0.2Newtons of thrust over the typical test range of about 30N to 150N. That range applies for our typical rockets with pressures of around 120psi with nozzles under 10mm. The same setup will also be used for full bore tests of up to around 600N.

I'm pretty happy with the sensitivity of the setup as is and would be great for most of the tests, but hopefully with the improved cabling and shielding we should be able to achieve higher resolution. I'll post an update when we test that.

I mounted the load cell for the time being to a big chunk of steel which will be eventually mounted on the test stand.
_________________________________________________

Saturday, August 16, 2008

New test stand work

We have been working on a side project for the past couple of weeks. We are keen to build a new thrust measuring test stand for testing design changes, but doing it the old way of recording a kitchen scale on video and then manually transferring the data into a spreadsheet just wasn't going to cut it for accuracy, and especially for making multiple runs.

We are doing it properly this time with an electronic data logger and a load cell hooked up to the laptop. The main problem with trying to do it the proper way is the higher cost involved as the equipment typically isn't your regular mass produced consumer electronics. The guys on the Australian Rocketry forum were a great help in recommending which equipment to use, things to look out for, and generally how to set it up. The data-logger we chose was from DATAQ. They have a number of different loggers with different capabilities at a very reasonable prices. I was very impressed with the delivery time from the time that I ordered. I placed my order just before lunch time on Thursday with the Australian distributor, and the package from Melbourne was waiting for me on Friday when I got home from work.

The load cells also tend to be quite expensive - easily upwards of $150-200+. We had been researching a lot of different companies and finally found a new 70kg load cell from a Chinese manufacturer whose cost and delivery were far cheaper than local distributors. It is still likely to be about 10 days before it arrives. I don't know what the quality is like yet, but I believe it should be great for our purposes.

The data-logger and load cell aren't enough though, and we also need a load cell amplifier as the datalogger only reads in the -10V to 10V range. The load cell only produces miliVolts over the entire deflection range which is too low for the datalogger to get enough resolution. The amplifier basically converts these small voltage changes to a voltage range usable by the logger. It also provides the necessary excitation voltage for the load cell. Again you can buy these off-the-shelf but you will pay upwards of $100+. Being on a limited budget, we decided to build our own load cell amplifier instead, which is based on an instrument amplifier IC. The circuit is relatively straight forward and these IC's are designed for exactly this task. The IC has been ordered and is on its way from the US.

I'll publish the full details of the entire setup and suppliers when it's calibrated and working properly.

The data logger came with free "lite" software for capturing and viewing the data. However, being free there are some limitations in terms of exporting the data and maximum allowed sample rate. The max sample rate is 240Hz which is more than ample for us. The full software with higher allowed sample rates is another $200. You can also buy a $99 software add-on that lets you save the captured data into Excel friendly format. (doh)

The free software, however, does record the data into their own proprietary binary file format. I recorded a number of waveforms today, and looked at the data in a hex editor. I noticed that it was not encrypted, so it was relatively easy to reverse-engineer its format and write a small program that allows me convert their format into a text .csv file format that is directly readable by Excel. (saved $99 there :) )

The entire thrust measuring test stand + software should cost us under $300 when finished.

_____________________________________________
Sunday, August 10, 2008

Baryon II and Variable Nozzle

We have finished doing the flight log update for the last launch day at Doonside. The primary goal for us was to test the Mk2 staging mechanism with a bigger booster and sustainer.


Details of the new booster and sustainer are also included in the update.

http://www.AirCommandRockets.com/day65.htm

We have also been working on a technique to expel extra foam from the rocket in flight and came across a way to make a simple variable diameter nozzle. The details of the concept and a video of how it works is included in the above update.


There is lots of testing that needs to be done on the nozzle, and different materials to try so it looks like we might need to set up our old test stand again.

___________________________________________________

Friday, August 08, 2008

Thermal Testing

We have finished writing up results of the initial thermal tests. We will be adding to this post as we do further testing over the coming months.

http://www.AirCommandRockets.com/day64.htm

I am in the process of completing the flight log update from Doonside last week. Hopefull that will get finished in the next few days.

___________________________________________

Sunday, August 03, 2008

Mk2 Stager with bigger booster and sustainer

This weekend we flew the Mk2. Stager with a bigger booster and a bigger sustainer to see how it performs under greater loads and higher pressure. The Baryon II booster has a 7.2L capacity, 15mm nozzle and launches with 2.8L of water. The 3.35L Tachyon V sustainer uses a 9mm nozzle and 1300ml of water/foam mix. We flew both at 120psi.


It was a good flight, but the high wind conditions on the day caused the rocket to fly in an arc rather than straight up and as a result did not reach the expected altitude. Staging happened as expected and both parachutes on the booster and sustainer opened as expected.


We are currently putting together a flight log update, although it will be perhaps a week before it is posted, as we are also in the process of completing the write-up of the thermal experiments we did last week. There wasn't enough time to post the thermal results last week as most of our spare time was taken up building the new booster and sustainer. Sometimes you have to find the balance between sitting at the computer typing and actually building hardware.

_____________________________________________________